How to use SILLI
Love the moulds (or molds) you see in Cakeshops and on websites? You can create them yourself in the shape of your imagination. It’s as easy as A-B-C!
Just Mix, Knead and Mould! With our special made food grade silicone putty you just mix part A with part B, knead for 30 seconds and make your mould. The worktime is 10 minutes for your comfort. Let it cure for at least 2-3 hours at room temperature and after that in a hot oven and there it is. Ready to use. This putty has the consistency of cookie dough and is especially developed for both home and professional use. Think out of the box and create your own style. Think silli!
Instructions, how to create your own sillicreations mould.
SILLI is a pliable 2 component silicone paste with the consistency of gum. SILLI is very easy to use and can be used on almost every surface.
STEP 1
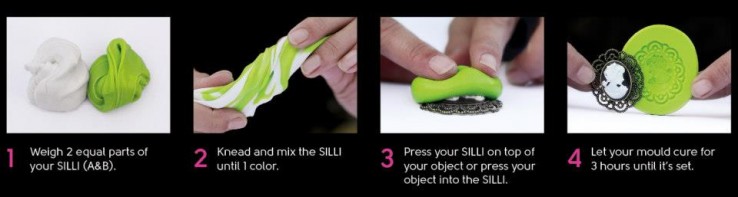
Weigh 2 equal parts of the silicone part A and part B (preferably using an electronic kitchen scale). It’s advisable to lightly grease the object to be copied before use with grease such as Crisco, make sure your hands are also lightly greased. Place a plastic placemat on your workspace whilst working with the silicone.
STEP 2
Knead and mix the paste for approximately 1 minute until you get a homogenized paste and a uniform color is achieved. The work time of SILLI is about 10 minutes. If you wish to make more moulds or a bigger mould then you can prolong the work time by placing the silicones in the refrigerator. Never use too much at once.
STEP 3
Press the object carefully, applying some pressure, in the silli plastique. Make sure all the details have been pressed into the SILLI. If necessary a thin layer of SILLI can be rubbed into the details of the object. De SILLI should cover the object completely, making sure the layer is thick enough. Rub over the mould with your fingertip for a smooth surface.
STEP 4
Leave the mould to set for 10 minutes at room temperature, remove the object from the mould and now.
Want it to cure faster?
Place the mould in a pre-heated oven at 100 degrees C or 212 degrees F for faster post-curing. Make sure the silicones are fully cured before you use it. Thicker moulds take longer to cure! Wash the mould in the dishwasher on the highest temperature. The mould is ready for use.
Extra information
. wash and dry your hands before making a mould. Make sure you have a clean workspace. Put a plastic placemat on your workspace to make sure the silicones don’t stick to your workspace.
. don’t use different materials at the same time and pay attention to the proper method. As we can’t monitor the use of the silicones we can’t guarantee a used product. Make sure the silicones are completely cured.
. always wash the mould in the hottest setting of the dishwasher before you use it.
. make sure the silicone mould is sturdy enough to avoid the mould from tearing.
. if you need more time to make the mould, make sure that the 2 components are as cold as possible, this slows down the work time, giving you a bit more time.
. the cured mould can be cooled or heated, no problem at all.
. you can store the SILLI in the packages in your cupboard. No special method is required.
. we advice to caution when using non-edible items on edible goods, and do not accept any liability whatsoever.
. make sure, at all times, that nobody puts silicone in their mouth or swallows the silicone. Phone the doctor in case of such an event. Utmost caution must be exercised at all times.